Ultra macro setup
A friend pointed me to a superb collection of insect macro photographs by Thomas Shahan on flickr. So, I decided to try and re-create his setup and see what happens...
So to start with, here is the setup:

Front to back I have:
If you remove the focusing rail from the bellows, the weight comes down to 1,150 grams. Still significant, but much easier to handhold (and the focusing rail is useless if you are handholding anyhow).
By the time you add the bellows, adapters, etc. The minimum extension behind the lenses is about 55mm. That gives you a viewing width of about 7mm which is a magnification of about 5:1 on full frame, or 7:1 on APC sensor. The advantage of using the telextender though, is that you get that magnification focusing at about 9cm in front of the lens (about 28 from the film-plane), which is a comfortable distance to work at. I did a quick test swapping the two lenses for a reversed 24mm lens, which gives you even higher magnification but you are then focusing a couple of cm away from the front element, and the bellows rail gets in the way!
Obviously, extending the bellows with any of these setups will give you even higher magnification.
Now, what about lighting and exposure?
Well, more tricky... The pictures below are fibres on a microfibre lens cloth (which you will see from the dust on the shots it wasn't used very effectively :-) ).
First attempt was with my desktop halogen light. That needed 0.5" at 1.4:
 Next I tried using a 9-LED torch, held at about 10cm from the subject. That gave me 1/30 sec at f:1.4:
 You can see that the DOF is tiny and, even with the focusing rail, it is extremely difficult to focus on the point you want. So to get the most of the lens, I closed it down to f:8, which then needed 1/4 sec:

Much much better! 1/4 sec is fine if you are mounted on a tripod and your subject isn't moving. Probably not great for jumping spiders though :-)
Next attempt was the flash. I have to say that the jury is out on this one because I have a feeling my flashgun was playing up. I think I should have got better exposures that I got. Nevertheless, here is (undiffused) 1/30 sec, stopped down to f:4
 That gives enough DOF at f:4 to be useful, and at 1/30 there is some hope (especially with Sony's in-camera anti-shake system) that you can handhold the whole setup.
Next steps:

So to start with, here is the setup:

Front to back I have:
- Minolta ROKKOR MD 50mm f:1.4 reversed
- Reversing ring
- Komura 2x telextender (Telemore95 II)
- Minolta Bellows II with focusing rail
- Custom made extension ring/Adapter for mounting Minolta MC bellows to Minolta/Sony AF DSLR mount
- Konika Minolta 5D Body (just for the photo here. The actual pictures below were taken with a Sony a350)
If you remove the focusing rail from the bellows, the weight comes down to 1,150 grams. Still significant, but much easier to handhold (and the focusing rail is useless if you are handholding anyhow).
By the time you add the bellows, adapters, etc. The minimum extension behind the lenses is about 55mm. That gives you a viewing width of about 7mm which is a magnification of about 5:1 on full frame, or 7:1 on APC sensor. The advantage of using the telextender though, is that you get that magnification focusing at about 9cm in front of the lens (about 28 from the film-plane), which is a comfortable distance to work at. I did a quick test swapping the two lenses for a reversed 24mm lens, which gives you even higher magnification but you are then focusing a couple of cm away from the front element, and the bellows rail gets in the way!
Obviously, extending the bellows with any of these setups will give you even higher magnification.
Now, what about lighting and exposure?
Well, more tricky... The pictures below are fibres on a microfibre lens cloth (which you will see from the dust on the shots it wasn't used very effectively :-) ).
First attempt was with my desktop halogen light. That needed 0.5" at 1.4:
 Next I tried using a 9-LED torch, held at about 10cm from the subject. That gave me 1/30 sec at f:1.4:
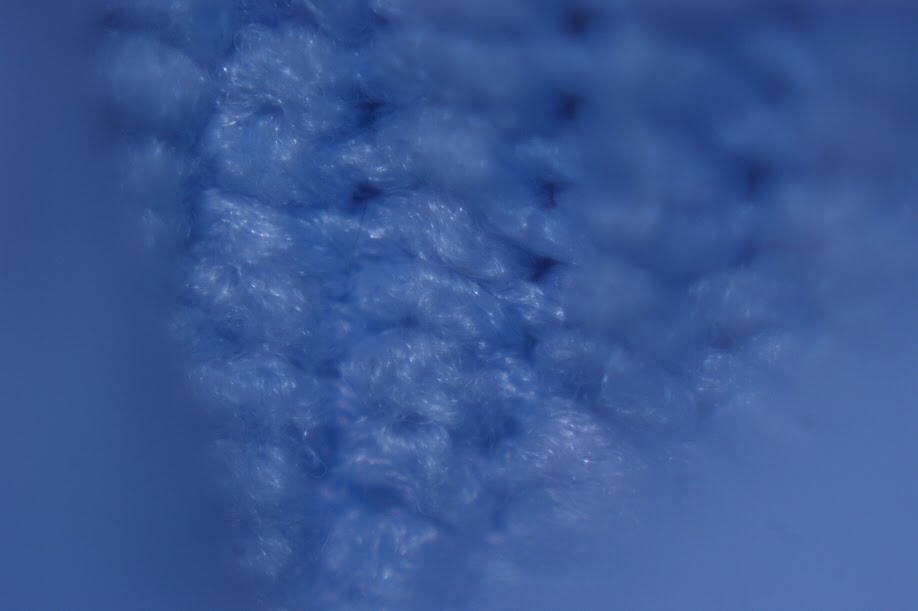 You can see that the DOF is tiny and, even with the focusing rail, it is extremely difficult to focus on the point you want. So to get the most of the lens, I closed it down to f:8, which then needed 1/4 sec:
Much much better! 1/4 sec is fine if you are mounted on a tripod and your subject isn't moving. Probably not great for jumping spiders though :-)
Next attempt was the flash. I have to say that the jury is out on this one because I have a feeling my flashgun was playing up. I think I should have got better exposures that I got. Nevertheless, here is (undiffused) 1/30 sec, stopped down to f:4
 That gives enough DOF at f:4 to be useful, and at 1/30 there is some hope (especially with Sony's in-camera anti-shake system) that you can handhold the whole setup.
Next steps:
- Find a way to mount the flashgun around the bellows and diffuse it
- make sure the flashgun actually works as it should...
- Investigate and experiment with Focus Stacking
- Find a willing jumping spider to model for me :-)
posted by George Parapadakis at 1:08 AM
![]()

0 Comments:
Post a Comment
<< Home