Friday, June 11, 2010

Ultra macro setup - continued...

Still working on the setup to prepare for real close insect macros. As you saw in the previous blog, the bellows + Reversal Ring + 50mm lens gave a great magnification, but was rather a rather cumbersome beast.

So, the aim here is to try and achieve as much of a comparable result, but simplifying the setup as much as possible.

Which Lens?

How much is much? I run some tests to find out what magnifications I could get with each combination. First of all, to understand the scale, this is what I'm photographing: It is the crown of an old, and rather battered, small ladies watch. You can see it here compared to a 20pence piece. The crown diameter is 3mm. All of the following shots have been taken with flash, 1/125sec on f:8.


The following are all complete frames (on a Sony a350):

Let's start with the standard Sigma 105mm macro. This is the biggest magnification you get:

105mm Sigma:


Adding the 2x telextender, effectively makes it a 210mm lens. The advantage of these two of course is that you maintain the full automation and metering functionality of your camera. A pretty safe world :-)

2x extender + 105mm Sigma:


Now time to experiment... I tried three different lenses, all reversed.

The first one was the 45mm f:2 Minolta Rokkor. This was the "standard" lens that came with the XD-7/11 but it has a distinct advantage over 50mm lenses, being very small and very light (120 gr). However it didn't do great on the magnification front, when reversed:

Reversal Ring + 45mm Rokkor:


2x extender + Reversal Ring + 45mm Rokkor:


Interestingly, the 45mm reversed gives very similar magnification to the dedicated 105 macro! One to remember for the budget-conscious... :-)

Now time to get serious. Thomas often mentions a 2x + 28mm, so a 28mm Vivitar f:2.8 (186 gr) was next in line...

2x extender + Reversal Ring + 28mmVivitar :


Now that more like it! Can we push it further? Let's try a Vivitar 24mm f:2 (284 gr)...


Now, that is serious magnification! 3mm almost fills up the whole frame. There are a few drawbacks on this setup through: (1) You need to get very close to the subject (a cm or two from the lens element) Apart from the fact that at such a distance it's very difficult to allow the flash light through, you also risk spooking the poor insect by getting so near. (2) DOF is a real problem. The shot above is at f:8 and even then, trying to keep anything in focus is a real problem.

So my favorite setup is the 28mm. The whole combination of 2x + reversal + lens is only 375 gr, and about 10cm long. (By comparison, the Sigma 105mm macro is 446 gr and 15cm long, when fully extended). Obviously a proper macro lens has a lot of different benefits, but my point here is that it's perfectly acceptable to handhold it. Especially compared to the 1,150 gr of the bellows setup in my previous article! And this concoction also focuses at about 3-4 cm from the front of the lens, which is more manageable than the 24mm.

This is what it looks like:


LET THERE BE LIGHT!

Having decided on the lens combo, the next one to sort was the lighting. You may remember that in my previous article I was not too happy with the result I got from the flash? Turns out I was right. The fault wasn't with the flash though, it was my own ignorance. I was using the flash off-camera through wireless, and I had left it set to TTL metering. When the camera is on fully manual and can't even tell that it has a lens attached to it, you can't expect correct exposures. When I set the flash (Minolta 5600 HS D) to Manual 1/8th strength, it gave me a perfect exposure at 1/125 sec at f:8!

I also tried various concoctions for mounting the flash, including a 40 yr old L-shaped bracket, with a ball-head flash mount! That was the best in terms of letting me position the flash exactly where I wanted it, but it made the camera holding and the weight distribution very awkward. When you are looking for steady holding, low DOF and manoeuvrability, the last thing you need is a lopsided camera! So in the end I went back to basics and put the flash right on the camera and used a blow-up diffuser which lets me point it slightly downwards. I will test it on a proper insect and see what it gives in terms of light pattern, but early tests look ok. Interestingly, the diffuser also hides the camera, flash and photographer from scaring the poor creatures away :-)


Who turned the lights off?

We are so spoiled with cameras nowadays. When you take a DSLR and look through the lens, the camera nicely keeps the aperture wide open to let you compose, focus, etc. For a split second before taking the picture it closes the aperature to your preferred setting and then opens it up again for the next shot.

You can forget all these luxuries with this macro setup. Using the lens stopped down at f:8, and then through a telextender which removes another two stops, means that you are trying to focus and compose your picture, looking through a tiny f:16 hole. In other words - darkness! If you are out and about in broad sunshine, that may be just enough to get by with. In anything less than perfect lighting, you can forget it - focusing is a hit & miss affair, at best.

Well, I borrowed an idea from the professional studio flash lights, which also have a "modelling"light that you can turn on while you set up your shot, before the actual flash goes off. You may have noticed it in the previous photo, here was my idea: Since the diffuser is attached to the flashgun with a draw-string, I strapped a small but powerful LED torch next to the flash head:


You will be amazed what difference that little gadget makes. Suddenly from pitch dark, you have enough concentrated light to find your subject and focus, using the actual depth-of-field that the lens's f:8 gives you!

So, I'm going ahead with this setup. Roll on the weekend and let's hope it does not rain so that I can do some bug-hunting :-)

Thursday, June 10, 2010

Ultra macro setup

A friend pointed me to a superb collection of insect macro photographs by Thomas Shahan on flickr. So, I decided to try and re-create his setup and see what happens...

So to start with, here is the setup:


Front to back I have:
  • Minolta ROKKOR MD 50mm f:1.4 reversed
  • Reversing ring
  • Komura 2x telextender (Telemore95 II)
  • Minolta Bellows II with focusing rail
  • Custom made extension ring/Adapter for mounting Minolta MC bellows to Minolta/Sony AF DSLR mount
  • Konika Minolta 5D Body (just for the photo here. The actual pictures below were taken with a Sony a350)
Some intresting facts: The combined weight of this setup (without the camera) is 1,710 grams and the shape is not the most natural to hand hold. It works fine on a tripod though, and given the insanely narrow DOF at f:1.4, the focusing rail is quite a blessing.

If you remove the focusing rail from the bellows, the weight comes down to 1,150 grams. Still significant, but much easier to handhold (and the focusing rail is useless if you are handholding anyhow).

By the time you add the bellows, adapters, etc. The minimum extension behind the lenses is about 55mm. That gives you a viewing width of about 7mm which is a magnification of about 5:1 on full frame, or 7:1 on APC sensor. The advantage of using the telextender though, is that you get that magnification focusing at about 9cm in front of the lens (about 28 from the film-plane), which is a comfortable distance to work at. I did a quick test swapping the two lenses for a reversed 24mm lens, which gives you even higher magnification but you are then focusing a couple of cm away from the front element, and the bellows rail gets in the way!

Obviously, extending the bellows with any of these setups will give you even higher magnification.

Now, what about lighting and exposure?

Well, more tricky... The pictures below are fibres on a microfibre lens cloth (which you will see from the dust on the shots it wasn't used very effectively :-) ).
First attempt was with my desktop halogen light. That needed 0.5" at 1.4:

Next I tried using a 9-LED torch, held at about 10cm from the subject. That gave me 1/30 sec at f:1.4:

You can see that the DOF is tiny and, even with the focusing rail, it is extremely difficult to focus on the point you want. So to get the most of the lens, I closed it down to f:8, which then needed 1/4 sec:


Much much better! 1/4 sec is fine if you are mounted on a tripod and your subject isn't moving. Probably not great for jumping spiders though :-)
Next attempt was the flash. I have to say that the jury is out on this one because I have a feeling my flashgun was playing up. I think I should have got better exposures that I got. Nevertheless, here is (undiffused) 1/30 sec, stopped down to f:4

That gives enough DOF at f:4 to be useful, and at 1/30 there is some hope (especially with Sony's in-camera anti-shake system) that you can handhold the whole setup.

Next steps:
  • Find a way to mount the flashgun around the bellows and diffuse it
  • make sure the flashgun actually works as it should...
  • Investigate and experiment with Focus Stacking
  • Find a willing jumping spider to model for me :-)
To be continued... :-)

Saturday, November 21, 2009

[3D Tutorial] – Stereo Photography

[3D Tutorial] – Stereo Photography - Part 5

Part 5 – Further reading

There are some very active yahoo groups that showcase 3D stereo photography and 3D-Anaglyphs

http://tech.groups.yahoo.com/group/anaglyphs/
http://groups.yahoo.com/group/photo-3d/

For additional reading I would redirect you to these sources which have additional reading material and most comprehensive cross-reference sections on Stereo 3D:

http://www.rmm3d.com/3d.encyclopedia/index.html

http://www.dddesign.com/3dbydan/3dlinks/linksct.htm

http://www.rmm3d.com/misc/links.html

http://info3d.home.att.net/StereoResources.htm

[3D Tutorial] – Stereo Photography - Part 4

Part 4 – Getting serious about 3D digital photography

As I said in the beginning, 3D photography is not new. There are still a lot of people that are passionate about it (as you will see from the reference links later). As you would expect, there are also much better ways of getting "proper" 3D photos than the humble cha-cha anaglyph presented in Part 2. Here are only some of the alternatives...

Film & convert


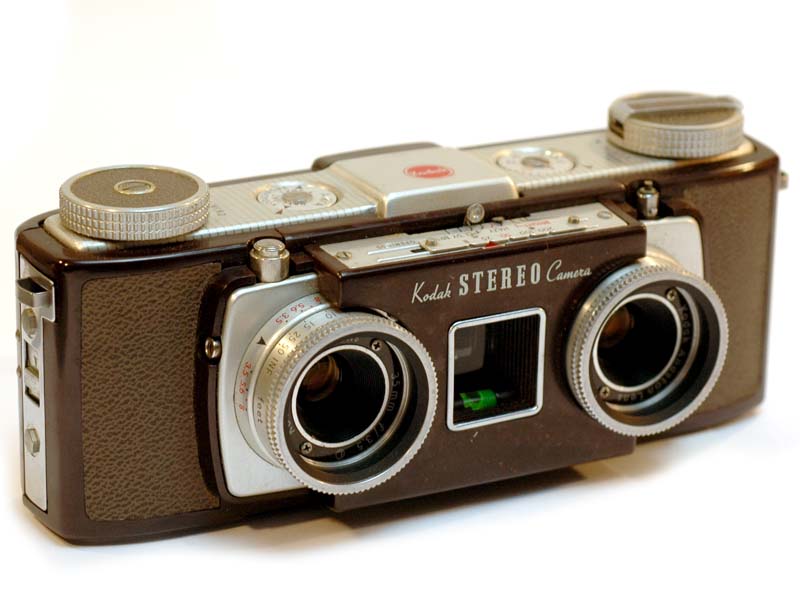
Use a stereo 35mm film camera and then scan the fill photo pairs into digital before creating the anaglyphs. It's a much longer process, but using an older camera with two lenses means that you can actually take 3D shots of moving themes too, wihtout being restricted to still life. Although not cheap, you can still find good secod-hand Kodak and Realist cameras on ebay for reasoable amounts of money. Two-lens SLR's do exist, but they are more rare to find and cost a lot more...

Digital 3D Stereo Camera


Fuji recently announced the FinePix Real 3D W1 camera, which is a pure digital stereo camera, and managed to get most of us interested in 3D photography drooling... However the prices are still very high (around UKP £450 at the time of writing this - Nov 2009), so for most of us it will remain a dream toy.

Two-camera Rigs

Several people have invested time and effort creating 2-camera stero rigs, using two normal digital cameras. Although not the easiest contraptions to carry around, nor cheap, when they are synchronised correctly, most will do an excellent job.


Split beams

An alternative approach, uses mirrors and/or prisms to generate two stereo images on a single frame, using a single camera. Devices such as a tri-delta rig and Loreo Lens in a cap can fit on your normal camera, with reasonable results.


A special case of artistic licence - 3D from 2D

Finally, it would be wrong of me not to mention one of the most ingenious pieces of software I've come across relating to 3D. It's not "stereo" photography in real sense, but it allows you to reconstruct very credible 3D versions of 2D images, through photo manipulation. The software is called 3D Gugle Pro and I would invite you to look at some of the work that it's designer has done on some classical masterpieces, in this gallery. Even if you don't attempt it yourself, it's well worth the look!

Thursday, November 12, 2009

[3D Tutorial] – Stereo Photography - Part 3

Part 3 – Refining the technique

Selecting the right themes


Some themes work better for 3D than others. Especially where the stereo-pair of pictures are not taken at the same instant but in sequence (e.g. cha cha). Generally, themes that work well are static and don't change between the two shots. Animals, people, waves and windy trees are a disaster. Scenery, bridges and still life, work much better.

Also, try to select themes that have a strong dimensional character or perspective. Leading lines such as walk paths or bridges work very well. Pictures with multiple depth levels (foreground, mid-ground, background) also work well. Pictures that are by their nature two-dimentional (a wall, a painting, a far away mountain range) don't lend themselves to 3D work.

Tripods & supports

One of the fundamental principles in creating anaglyphs, is that the pictures are taken from the same vertical plane. so ideally, the two shots should be taken with the camera at the same hight and pointing in the same direction and only shifting horizontally.

There are third-party "slide bars" that allow you to mount your camera on a dripod and shoft it horizontally. If you are interested in buying one, just click on the picture:


However, here are some other ways you can achieve the same effect. If your tripod allows you to move the central column to a horizontal position, you can usually shift the camera along horizontally:


If you are lucky enough to have a set of bellows (or can get hold of one!) with a separate focus rail, then mounting the camera sideways gives you the identical functionality of a slide bar, with a lot of control. (The one shown here is from a Minolta series II bellows):


If you are a crafty DIY man or woman, then you can always make your own of course... Click on the picture to see how.


Keeping it consistent

Last tip: consistency between the pictures in the stereo-pair is important! To get the best results you should have the same focus and the same exposure between the two shots. Once you have mounted your camera on your tripod and slide bar, take a test shot and make sure your camera has focused correctly. If your camera allows you, switch at that point to manual focus (MF) and you should retain the same focus point.

Similarly with exposure: take a few test shots to determine the correct exposure for your shot. Then make a note of the reading, and set your camera manually to the same setting for the two pictures. This is especially important when shooting outside where the light is changing constantly. It's better to have a pair that is consistently over/under-exposed, than one of each! (hint: If the sun is playing hide and seek in and out of the clouds, wait for a few minutes to let it stabilise one way or the other, between taking the pictures!)

[3D Tutorial] – Stereo Photography - Part 2

Part 2 – Create a basic 3D picture

Doing the cha-cha

Let me quickly introduce you to the cha-cha method. No, not the dance, although that’s where the name comes from. In order to create a real 3D image, you must always start with two different pictures. Typically taken about 6.5 cm apart (same as the distance between your pupils). So the cha-cha method is a quick and dirty way of taking two shots with your camera, by standing with your feet firmly planted on the same spot, but shifting your body weight from one leg to the other – shift to the left, cha, shift to the right, cha! Get it? Good.

Don’t worry too much at this point about the accuracy, but try as much as possible to not twist or swivel the camera. Just keep it on the same vertical plane and move it along horizontally between the two pictures. Also try to shoot something static and avoid subjects that would have changed positions between the two shots…

So now you have a “left eye” and a “right eye” picture. Download them on your computer and let the fun begin…

Now, you need a pair of red/cyan glasses (sorry can’t avoid that!) and a piece of free software: Download and install a piece of software called “Stereo Photo Maker (SPM)”. It’s free in its basic form and will do the job very nicely. Other ones (e.g. AnaMaker) are also available and worth exploring later, but I’m sticking to SPM here as that’s what I’ve got installed on my machine.

Once SPM is up and running, use File - Open Left/Right Images to open your “left eye” and “right eye” pictures. SPM knows it’s a stereo pair and will display the pictures side by side. If you choose the option Stereo - Color Anaglyph - Color (red/cyan) from the menu, or just hit F7, it will give you immediately a basic anaglyph version of the two. Now, if you look at it through your 3D glasses, unless you have been spectacularly accurate in your cha-cha method (unlikely), it will probably just look a mess and give you a headache. Don’t worry, we will fix that!

The next step in the process is Alignment. Remember the experiment with the pencil in part 1? The brain can judge the distance, between the front and the back, because your two eyes have a fixed position to each other. When you moved your camera about between your cha-cha shots, chances are that quite a few things changed, so we need to bring the cyan and the red pictures back in alignment.

The simplest way to "fix" the picture is to just hit the “auto” button (or select Adjust - Auto Alignment from the menu or Alt-A) and SPM will do the most of the work for you. If you want to do the basic alignment manually, just identify one of the objects in the foreground of your picture (like the tree in this case) and use your arrow keys to shift the two images until that part of your picture meets up.

Congratulations! You have made your first Anaglyph 3D picture! Use File - Save Stereo Image to save it as a JPG and upload it to your favorite site to show-off to your friends:-)

If you explore SPM a bit more, you will dscovervarious tweeks to allow you to improve the picture further before you save it. Here I have used the sharpening function and selected the "No compression ghosting" option in the save dialogue.

Once you have mastered the basics of creating 3D images, read the following sections for some tips and tricks to improve your technique and how to spend some serious money if you really want to get into stero 3D properly! :-)

If you use these tutorials, please leave me a comment and a link to your work. I would love to see other people's 3D work!

[3D Tutorial] – Stereo Photography - Part 1

Part 1 – History and theory

This part is a bit academic, but it will give you a basic understanding of why things work the way they do. I recommend that you read it, but if your fingers are itching to try something, skip to Part 2.


Brief History of stereophotography

The roots of stereo photography go as far back as the end of 19th century.


The technique was popularised in the early ‘20
s, which saw several different stereo cameras and viewers mass produced, using glass plates.


It then declined until the late ‘40
s when a new range of 35mm stereo cameras produced and later with toy viewers like the ViewMaster™.


Digital photography has made 3D photography relatively easy again and although we still don’t have a digital 3D camera available, other techniques have been developed. (see Part 4)


Basic Principles

Stereo photography is based on one fundamental principle: That our two eyes, see a slightly different picture, and the brain is using the discrepancy between the two, to assess depth and distance. This is not the only mechanism the brain uses (others are movement, focus, shade, etc) but it is the most fundamental one.

The easiest way to illustrate this, is with a simple experiment. Hold up a pencil, or even your finger in front of your face, and by closing each eye in turn, observe how the pencil is positioned against objects further away in the background:


Left Right


If we align these pictures on the pencil, you will notice that the images of the background are shifted from each other. Conversly, if the background is aligned, then the pencil appears double. The brain performs the same assessment, moving from one to the other, and can therefore “guess” the distance between the two layers (panes)


Stereo photography exploits this principle by combining two different pictures in a way that each eye is presented with a different view, similar to what each eye would see if they were actually looking at a 3-dimentional scene. The brain then is “tricked” in assessing the distance, creating the illusion of a 3D image.

Assuming you have these two images available, there are a number of ways of presenting them. The most basic is just simply pitting them side by side with a divider in the middle, and allowing each eye just see one of them. Another is to have special viewing glasses (like binoculars, but with prisms). Another yet, is forcing your eyes to look cross-eyed, until the two images are forced to align in your vision.(You can try it with this image. It works, but don't complain to me if you get a headache!)


All of these are possible and have their merits, but the most common approach for digital photography is the Anaglyph method.

The Anaglyph method, is based on altering the tint of each picture of the stereo pair with a different colour (typically red/cyan) and then overlaying the two stereo images. You need to use a special pair of filtered glasses to view the picture, but these are available for a few pennies. With this method, the left eye sees only the red picture through the red filter, while the right eye, through the cyan filter, sees only the cyan picture.


A similar method of overlapping images is used for movies, but instead of using red/cyan glasses, it uses polarizer glasses, with one lens polarized horizontally and the other vertically. Unlike Anaglyph, it only works with projected light, but it has the advantage of not interfering with the picture's colours.

Now that we've covered the basic principles, in the next part we will create a very basic 3D Anaglyph picture.

[3D Tutorial] – Stereo Photography - Intro

Intro - How to create 3-Dimensional pictures with your normal digital camera.

I got my first “taste” of stereo photography as a toddler. My grandfather (who died before I was born) was a stereo photographer, and left behind a legacy of stereo glass plates, a couple of cameras and a beautiful stereoscopic viewer. As a kid, I’ve spent hours fascinated by this giant Viewmaster!


While I was shooting film, I never considered doing my own 3D, but digital cameras opened up a whole new world of possibilities. I am not an expert in stereo photography, there are people out there who have much more experience and much better understanding of the theory behind it. In this tutorial, I hope I can give you some basic techniques that you can use to generate some primitive (but real!) 3D photographs.

In the next few sections, I will show how you can create real three dimensional photographs using your normal digital camera.

Sunday, April 05, 2009

Through the looking glass - How I did it...

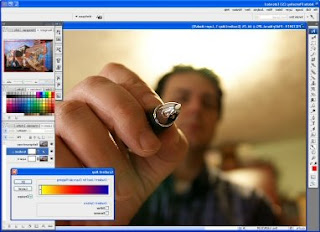
Several people asked me to explain how I did my "Through the looking glass" self-portrait (you can find the final on RedBubble here: Through the looking glass)

It isn't really complicated and you can do this with any editing software that uses layers.

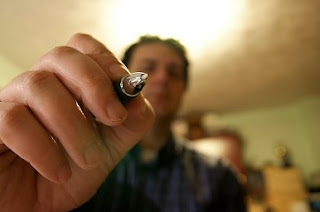
Step 1: Take a picture of yourself. For this I propped the camera on my desk with the lens at its widest wide-angle, set it to Aperture Priority with a wide-open aperture (to minimise the depth-of-field and reduce exposure length) , used a remote control cable for firing the camera and let the autofocus do its thing! Pointing the pen towards the middle of the lens, made sure that the autofocus locked on that, trowing my face out of focus creating a sense of distance.


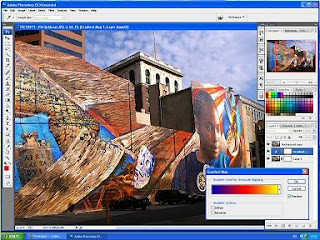
Step 2: Fire up Photoshop (or your favourite editor). Here I needed two things: (a) to make it obvious that this is a photo editing application and (b) to make sure that the "navigation" window, showed a different picture than mine, as this is supposed to look like I'm editing something else! So I opened up a colourful picture and made sure that the colours pallete was showing, I've added a couple of duplicate layers to fill up the layers pallete and openned up a gradual adjustment pallete with a coloured graduate. Just for the effect.

I then took a screenshot of my screen. You can use a dedicated screen capture program or - on a PC - use CTR-Shift-PrtSc. That puts the screenshot in the clipboard and you can then paste it into your photo editor as a new picture.


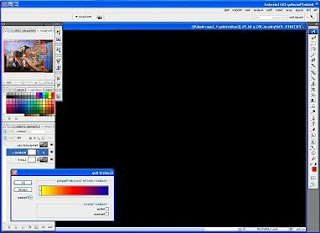
Step 3: Open up the screenshot in your editor and remove the visible contents of the main window. I used rectangular selections and the Delete button to turn the window to black. After that, use the Image mirroring function to turn the picture left to right (remember, we are supposed to be looking through the computer screen! i.e. from the other side). Let's call this part of the picture "the frame".


Step 4: Now comes some layer work... I promoted the background to a full layer, and opened up the photo of myself from Step 1, and pasted it into the screenshot image as "paste as a new Layer". There are various ways of doing that. Another way would be to use File/Place (in Photoshop), as it allows you to resize the image at the same time. Once you have both images as layers, change the order so that the portrait is the bacground and the "frame" the foreground. Next, you add a mask layer onto the frame picture. Select the mask layer and using rectangular selctions again, start masking out the center of the frame (the black part). As you do this, you will see the background picture coming through.


Step 5: We're almost there... Now for the last part, we need to throw the frame "out of focus" so that the pen stands out as the only focusing point. Select the whole layer group with the frame and its mask, and merge them into a single layer. With that layer selected, Choose "Gausian Blur" with a relatively low value (3 or 4 should do it).


Step 6: That's it! flaten the image and save it as a JPG.


I'm sure that the more skilled PhotoShop practitioners amongst you will spot several shortcuts on how this could be done in a much better way with a shorter process. But that's how I did it!
George :-)