Through the looking glass - How I did it...
Several people asked me to explain how I did my "Through the looking glass" self-portrait (you can find the final on RedBubble here: Through the looking glass)
It isn't really complicated and you can do this with any editing software that uses layers.
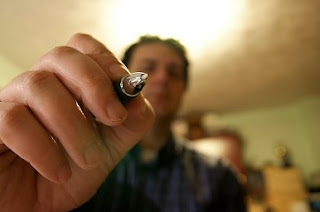
Step 1: Take a picture of yourself. For this I propped the camera on my desk with the lens at its widest wide-angle, set it to Aperture Priority with a wide-open aperture (to minimise the depth-of-field and reduce exposure length) , used a remote control cable for firing the camera and let the autofocus do its thing! Pointing the pen towards the middle of the lens, made sure that the autofocus locked on that, trowing my face out of focus creating a sense of distance.
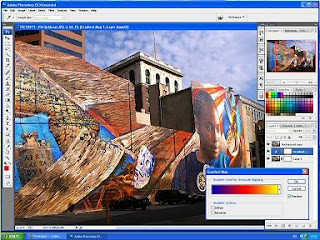
Step 2: Fire up Photoshop (or your favourite editor). Here I needed two things: (a) to make it obvious that this is a photo editing application and (b) to make sure that the "navigation" window, showed a different picture than mine, as this is supposed to look like I'm editing something else! So I opened up a colourful picture and made sure that the colours pallete was showing, I've added a couple of duplicate layers to fill up the layers pallete and openned up a gradual adjustment pallete with a coloured graduate. Just for the effect.
I then took a screenshot of my screen. You can use a dedicated screen capture program or - on a PC - use CTR-Shift-PrtSc. That puts the screenshot in the clipboard and you can then paste it into your photo editor as a new picture.
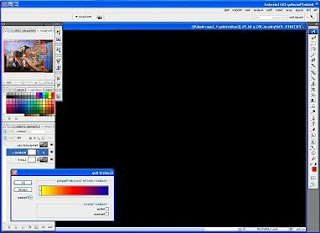
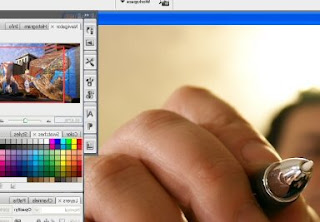
Step 3: Open up the screenshot in your editor and remove the visible contents of the main window. I used rectangular selections and the Delete button to turn the window to black. After that, use the Image mirroring function to turn the picture left to right (remember, we are supposed to be looking through the computer screen! i.e. from the other side). Let's call this part of the picture "the frame".
Step 4: Now comes some layer work... I promoted the background to a full layer, and opened up the photo of myself from Step 1, and pasted it into the screenshot image as "paste as a new Layer". There are various ways of doing that. Another way would be to use File/Place (in Photoshop), as it allows you to resize the image at the same time. Once you have both images as layers, change the order so that the portrait is the bacground and the "frame" the foreground. Next, you add a mask layer onto the frame picture. Select the mask layer and using rectangular selctions again, start masking out the center of the frame (the black part). As you do this, you will see the background picture coming through.
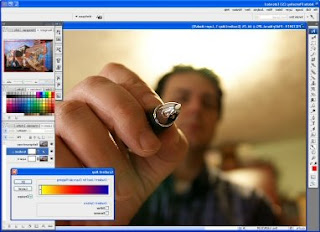
Step 5: We're almost there... Now for the last part, we need to throw the frame "out of focus" so that the pen stands out as the only focusing point. Select the whole layer group with the frame and its mask, and merge them into a single layer. With that layer selected, Choose "Gausian Blur" with a relatively low value (3 or 4 should do it).
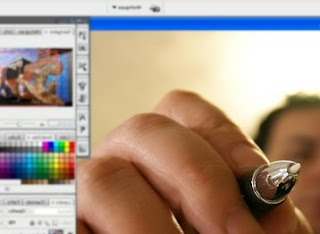
Step 6: That's it! flaten the image and save it as a JPG.

I'm sure that the more skilled PhotoShop practitioners amongst you will spot several shortcuts on how this could be done in a much better way with a shorter process. But that's how I did it!
George :-)
It isn't really complicated and you can do this with any editing software that uses layers.
Step 1: Take a picture of yourself. For this I propped the camera on my desk with the lens at its widest wide-angle, set it to Aperture Priority with a wide-open aperture (to minimise the depth-of-field and reduce exposure length) , used a remote control cable for firing the camera and let the autofocus do its thing! Pointing the pen towards the middle of the lens, made sure that the autofocus locked on that, trowing my face out of focus creating a sense of distance.

Step 2: Fire up Photoshop (or your favourite editor). Here I needed two things: (a) to make it obvious that this is a photo editing application and (b) to make sure that the "navigation" window, showed a different picture than mine, as this is supposed to look like I'm editing something else! So I opened up a colourful picture and made sure that the colours pallete was showing, I've added a couple of duplicate layers to fill up the layers pallete and openned up a gradual adjustment pallete with a coloured graduate. Just for the effect.
I then took a screenshot of my screen. You can use a dedicated screen capture program or - on a PC - use CTR-Shift-PrtSc. That puts the screenshot in the clipboard and you can then paste it into your photo editor as a new picture.

Step 3: Open up the screenshot in your editor and remove the visible contents of the main window. I used rectangular selections and the Delete button to turn the window to black. After that, use the Image mirroring function to turn the picture left to right (remember, we are supposed to be looking through the computer screen! i.e. from the other side). Let's call this part of the picture "the frame".

Step 4: Now comes some layer work... I promoted the background to a full layer, and opened up the photo of myself from Step 1, and pasted it into the screenshot image as "paste as a new Layer". There are various ways of doing that. Another way would be to use File/Place (in Photoshop), as it allows you to resize the image at the same time. Once you have both images as layers, change the order so that the portrait is the bacground and the "frame" the foreground. Next, you add a mask layer onto the frame picture. Select the mask layer and using rectangular selctions again, start masking out the center of the frame (the black part). As you do this, you will see the background picture coming through.

Step 5: We're almost there... Now for the last part, we need to throw the frame "out of focus" so that the pen stands out as the only focusing point. Select the whole layer group with the frame and its mask, and merge them into a single layer. With that layer selected, Choose "Gausian Blur" with a relatively low value (3 or 4 should do it).


Step 6: That's it! flaten the image and save it as a JPG.

I'm sure that the more skilled PhotoShop practitioners amongst you will spot several shortcuts on how this could be done in a much better way with a shorter process. But that's how I did it!
George :-)
posted by George Parapadakis at 11:44 PM
![]()

0 Comments:
Post a Comment
<< Home